Tuesday, May 31, 2011
Motherhood: A Lesson in Humility
Okay, okay, we WANT to be humble, right? I mean, there are loads and loads of verses in the Bible that assure us that those who humble themselves will be exalted by the Lord...this week, though, I haven't needed to do any of the humbling; my kids seem to be taking care of it FOR me!
I'm not kidding...from sneaking in on girls who were using the restroom to slapping a sibling, to drawing on furniture to talking back to adults my kids have covered it ALL. I know I shouldn't let it "get" to me...I know I should take it in stride and simply discipline and redirect them...and I did...but at the same time my pride is taking a beating. I have been embarrassed by their bad behavior, saddened that they aren't demonstrating the lessons I've tried to teach, and, to be frank, I am frustrated that apparently my lessons have fallen on deaf ears! I'll bet most of you are nodding your heads and maybe even giggling in commiseration with me...some days are just LIKE that, aren't they?
Last Thursday when my nerves were shot and I knew I needed to take a break I sent everyone to rest time and took a cup of tea onto the deck. I closed my eyes and prayed...HARD. And the thought came to me, "humble yourself"...which then made me think of "Humble Thyself" from my days at Bible camp...and I was restored...to humble myself to parenting...to perhaps being cut down a peg or two from thinking my kids were so "perfect"...to knowing that they are going to sin, they are sinners just like their Mommy, right? To knowing that my kids are not ME....God knows that I'm trying to teach them, to discipline them, to show them His way...and that's what He has asked of me. Most of all I was reminded to continually ask God to help me parent...He is the ultimate parent...why in the world would I not ask Him EVERYDAY to help me parent these little ones He has entrusted to me? So yes, that afternoon I humbled myself...and He lifted me up...He raised my head to face the rest of the day and the days to come. I am humbled that He would.
So, that is how we find ourselves at our Memory Verse for this week:
Ephesians 4:2
Be completely humble and gentle; be patient, bearing with one another in love.
Here's praying YOUR humbleness comes with fewer gray hairs than mine!
Monday, May 30, 2011
Make a List Monday**May 30, 2011
This week we asked: Five Best Ways to Fill a Summer Day
Oh, where to begin, right?! If you're like me narrowing it to ONLY five is tricky! I would say my top five are:
1. Swimming...we are blessed to live a block from the lake. If I could I'd sit there all day, every day!
2. State Park Adventures...we are lucky to live close to one and going and walking is one of my favorites.
3. Family Adventure Day...we hop in the car and just flip a coin to go left or right...we might pack a lunch, the fishing gear, swim suits "just in case" and see where the day takes us.
4. Gardening...okay, this is one of those things I tend to do by myself, but I find it to be so much fun I'm including it anyhow!
5. Visit Friends/Family...it seems like everyone is up for getting together in the summer...schedules are less hectic and people are ready to PLAY.
For the next week, please share your favorite blogs...I'm SUPER curious what everyone likes to read online! No particular number, just a few that you enjoy and a little synopsis of what the blog is about.
Sunday, May 29, 2011
Happy Birthday!
Today is my Mom's AND my Father-in-Laws' Birthdays! Happy Birthday to them both! However, I'm pretty sure that my FIL would NOT appreciate being on my blog, so I'm not going to bring him into this post any more than I already have. ;) I do wish him a GREAT day, however!
About my Mom...she is AMAZING. For real. I love her so much...she is smart, sensible, unfailingly kind, servant hearted, creative, able to laugh at herself, hardworking, supportive...I'm not sure there are any positive adjectives that DON'T describe her, to be honest! Maybe not "athletic"...though she is freakishly strong...so maybe she would still qualify as "athletic" too! SHE is superwoman...with a sewing machine.
* She has this fantastic sense of humor
* A faith in God that just doesn't seem to ever waver. She knows what she knows and she KNOWS it.
* She has people in her life who make her nuts...and she is kind to them anyhow.
* She can have a conversation with ANYONE for ANY length of time...which is why she ROCKS at her job at an assisted living residence.
Oh, and I mentioned it before, but she LOVES to sew....and not just pretty things for her house, but gifts for other people and each year her WELCA sewing group of about 4-8 ladies makes 200+ quilts to give away. I'm serious. If you're doing the math that is about 30 quilts per woman! AND my Mom is one of the "young" ones in the group. Talk about hearty women....I'm proud to be of such good stock!
I could go on and on (and on and on) about my Mom (I guess I kind of already have!), but in short...my Mom is my hero...and you know what? I think its because when we were growing up I could tell she LIKED being my Mom. Sure, we drove her nuts...we got spankings...we were disciplined...she pulled her hair more than one or two times...she IS human, afterall (and, to be honest, we were kinda naughty)!
But, despite all that, even at the time, I knew that she LOVED me, she treasured having me as her child, she liked to talk to me, to KNOW me, to be part of my world. She took time whenever she could, even just a few minutes before bed, to spend time with me... Isn't that the bottom line of parenting? That our kids KNOW that we love them? We TALK to them, we LISTEN to them, we dig into life with them, we grow with them, and fail in front of them and have the good sense to admit it and show how to come up with a smile on our face, asking for forgiveness and doing better next time?
Most of all, I am thankful for her modeling for me that Motherhood is a blessing...a treasure...an experience of joy and chaos and laughter and frustration and overwhelming responsibility...an opportunity to let your heart walk around outside your body, to love in a way you've not yet experienced. Thank you, Mom, I love you TOO much!
Saturday, May 28, 2011
Questions Saturday**May 28, 2011
Q: I thought I read somewhere that you cloth diaper...what kind of diaper do you use? What do you suggest? What about wet bags?
A: This is a question I have gotten a number of times because cloth diapering is really making a come-back, which is exciting. There are some challenges to cloth diapering and it may not be a viable option for everyone, but it has worked for us. I think, as with all parts of parenting, the topic of diapers needs to be considered, researched, and an informed decision made.
In the event that you're in the researching stage here's what I know from my experiences:
I have used the following:
Gerber cloths folded and held with pins/plastic pants over—fine, but rather messy. The spouse wasn't a huge fan of this and would normally reach for a disposable backup with these because of the pinning issue…this meant I change Finn and Kiki a lot...it also wasn't something we used when we were away from the house because of the added supplies it required...I'm sure we COULD have made it happen, but we found it to be an added pain we didn't want.
Haute Pockets—this is a “pocket diaper”; one size fits all…which means there is a space in between the waist band and the part that is against the baby that is a “pocket” where you can put your absorbers (micro fiber inserts, etc.)…this is nice because you can customize how much absorbency your baby will need. I got “hook and loop” (aka Velcro) and “snap” closures…the snaps take a bit longer, but look nicer longer; the hook and loop got kind of filled with fuzzies and looked frayed within the first six months or so. At first I LOVED Haute Pockets; but of all the diapers I've gotten they now look the worst...mainly that the inside lining is coming apart...as in, separating from the fabric itself.
There seem to be some colors than are worse than others (mint green was the first to go). I understand that they went out of business for awhile and were working to improve their product...I'm not entirely sure what the "deal" is as I see their diapers on various webstores...ours were purchased in 2008, but I have also had problems with a few I bought in 2010. I love them, but it might be a gamble for others to try them.
Fuzzi Bunz Size Medium—another pocket diaper, but you have to pick a size. I do like the medium size, though. My kids fit them well starting at 5 months and wore them until potty trained (around 3 years…sad, I know, that it took them that long!). They do need extra inserts; in addition to what they come with…I used my Gerber cloths for this purpose! Some layers of flannel would work great. They come with snaps and look the best of all my diapers that have been around for 3.5 years…they are the most expensive, though. They also have come out with a one-size version; haven’t tried it…probably is good since the fitted are nice.
With Leve I was able to borrow some Larges from a friend...they have been AWESOME to have as they fit her so much better than the mediums...If I were buying for my first I would definitely get some of each of the sizes knowing that all of my kids would be using them...Fuzzi Bunz are just that good.
Bum Genius 3.0 One Size Pocket Diaper—just got a few of these with TJ as my Haute Pockets were discontinued and several of my girl friends from when we worked at the Bible Camp use these (and I had gift cards to Target and at the time Target website carried this brand)…I have liked it. It has held up well, while definitely absorping a lot. One thing I have to comment on is that it is a nice size for littler ones (it folds up nicely to make it smaller), but it looks like it might not fit them all the way to the potty training mark….which is a bummer for me since mine don’t seem to train early.
Dry Bee’s All In One (AIO)—I only bought one of these and I’m glad….the absorbency isn’t that great, it takes FOREVER to dry after its been washed…All in One means that all the layers are together…you can add another layer in between the diaper and the baby, which I do to make it work, but overall I think you’re better off with one of the other options….this is the MOST like disposable diapers in the usage, though, as you never have to “stuff” your diapers.
Kushies, Infant Sized Pocket Diaper—These are another brand I purchased when TJ was born in 2010 to add to the "stash". I had a gift card to Wal-Mart and these were the cloth diapers they offered on their website so I ordered a couple…they were CHEAP…like $10 a diaper. They are fine...a little more bulky than the other diapers, but fine. Honestly I can't complain about them, but I also don't have anything noteable to say about them either...beyond that I wish that the opening were bigger so it was easier to "stuff" them.
Mudd Butt Cloth Diapers—These are made by a Mom in southern Minnesota…it feels AMAZING to order from her and know that 1) You’re supporting a hardworking mama 2) They are somewhat local so there isn’t a lot of fuel emissions happening to even get your diapers to you! I have two of them and they are really nice. I love that she sends some extra snaps with "just in case", though I haven't had to replace them. You can customize your diapers with her, which is neat...you can pick the PUL and the snap colors so you could really do some fun things. I do find that the one-size-fits-all run a little smaller than the Fuzzi Bunz and the Haute Pockets...they are more like the Bum Genius size which doesn't fit Leve and won't last TJ until he's much past 2...which would be fine if I could get these kids to train early...but so far I'm 3 for 3...I'm pretty sure I won't get any questions about potty training...ha, ha! You can find her on Facebook and link to her Hyena Cart from there.
So, what to put the wet diapers into?
Wahmies—Travel Wet Bag*Large Wet Bag—you need a bag to put your wet diapers into as most of the diapers don’t soak like the cloth/pin diapers do. This bag is water proof and you can just empty your diapers from it straight to the washer and add the bag in there too! I am super happy with both of mine. The travel bag I got was the “large”…it is a decent size for a day out. We bought a nice metal step-on-the-pedal-to-open garbage can and put the large wet bag liner in there and it works great for storing them until washing day.
I recently bought a Mommy's Touch regular and travel wet bag so I had two sets and didn't have to rush to get each load through and they have been fine. They were quite a bit cheaper than Whammies and, while they are working fine, you can definitely tell a difference between the products. I haven't had them long enough to know if it makes a difference or not in performance.
Wipes—I just took squares of flannel and put the wrong sides together and surged around the edges. I put them in a plastic box that disposable wipes come in, and then make a mixture of water, Burt’s Bees Baby Shampoo, and olive oil over the wipes. They get washed and dried with the diapers. Every couple months I do a separate washing of the wipes with bleach to kill whatever might be on them and make them smell good again. When we are out and about (or I'm TOTALLY overwhelmed with life as it is...we use store bought wipes...lazy, I know.)
How many do you need?
We have an abundance since my friend is borrowing us those larges! We have 22 of the sizes that fit TJ and about 20 of the ones that fit Leve (thankfully, as I write this she is potty training so they are sitting and only being used at night)...are we blessed or what?! I remember having only 10 or so and washing ALL the time and having to hustle to get them turned around so the babies were covered! With my current abundance I actually bought a second wet bag so that I could have two sets going through the cycle of worn/washed/dried/putaway at a time and not have to rush. HUGE hugs to Ms. R for helping us with that during this busy, BUSY time...The Spouse is a great diaper stuffer and is missed!
Another word of advice…be sure to follow the directions your diapers come with…and remember that the SUN will do a LOT to help with smell/discoloration/etc…
I hope that helps! I know when I first started researching something “new” to get rid of the pins it was so overwhelming...all the choices and brands...ugh!!! I just sorta plunged in and did my best, so I’m happy to be able to help someone else!
Friday, May 27, 2011
Simple Cuffed Pants Tutorial
I get a huge kick out of dressing my kids and Anne's kids alike...so does Anne's Mom...we restrain ourselves to once a year...it's tough to do, believe me. Easter is our one time a year we cajole the kids (and Anne) into letting us have creative license over their outfits. Well, this year it happened that the Easter Pageant required them to dress in pajamas...so pajama pants were in order. Anne's Mom did the shirts, I did the 6 pairs of pants...in about 4 hours...with loads of interruptions from my kids...without a pattern. Seriously, only 4 hours...and I'm NOT that good of a seamstress. Honestly, I'm NOT...I took 4-H sewing, but it didn't come easily to me and I always had lots of adult help! I want to encourage you to ENJOY motherhood...maybe you ENJOY seeing your little ones in something you created...that is the case with me. If the thought of trying to do that makes your blood pressure rise I encourage you to find something that DOES give you enjoyment and go for that instead. ;)
Here's how to do it...
First, find a pair of pants that fits your child well...something that is roomy in the waist and buttocks region will help you later. Fold the pants in half and lay them on the folded fabric.
You'll notice in my picture that I put the "crotch" of the pants AWAY from the fold...this makes it so you don't have to sew a side seam on the side of the pants. Second, you'll also notice that I folded the fabric WAY down so as not to waste any.
Cut around your pants leaving about 1 inch all the way around to allow for the seam allowance and to make them nice and roomy.
Now that you've got the one side you're going to do it again to make the other side. You'll notice I used the one we just cut...that is so that your sides match up better than when you were doing it with the "pattern" pants.
Notice that the crotch still points away from the fold on the fabric you'll be cutting.
Now you have TWO sides of the pants.
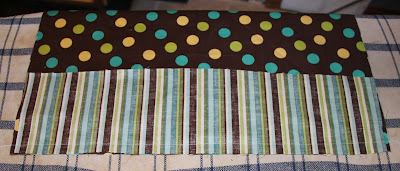
Now you'll cut a piece of fabric from your coordinating fabric that is as wide as the pant leg when its laid out and about 3 inches wide...you can make it wider or thinner depending on how long you want your child's pant to be AND how much fabric you want to have showing. Pin them right sides together. And stitch along the bottom to connect them.
When you're done it will look like this
And you'll need to lay it on the ironing board and turn it down and press it flat.
Next you'll lay the two sides of the pants with right sides together and pin the crotch area and sew it together.
Then you'll fold them the other direction and match up the insides of the legs. Pin them and sew them.
I'd say those are starting to look suspiciously like pants, aren't they?!
This is the point where you'll want to try them on your child...make sure that they are roomy enough in the hips and butt and make a mark on the pant where it lands on their hips...this will help you a lot with making sure the elastic lands on a comfortable place. At this time you'll also cut your elastic. Take it and put it around your child's waist so that it is snug, but not stretched...give yourself an additional 1.5 inches for overlapping, then cut.
Now, depending on how high (or low) the waist was on your child you'll need to fold it over to make a space to put your elastic...this is shown with two fold overs...be sure to iron it flat, then pin into place before sewing...it will make it easier, I promise. ;)
Next, sew where the pins are leaving a space between your seam and the top of the pant for the elastic to go. Also, you'll need to leave a space between where you start and where you stop that is just big enough for the safety pin and elastic to fit through.
Then, take the cut elastic and put a safety pin at the one end to act as needle as you thread it through the hole.
When you're done threading you'll overlap it and then sew it together...it is difficult to see in the photo, but I made a rectangle over the overlapped area...You want to make sure that is VERY secure.
Next we'll do the cuffs...take and turn them up according to your child's height...we set our to just graze the tops of their feet. Again, iron it into place, then pin, then sew.
Turn the entire thing right side out, iron as necessary, and enjoy!
Thursday, May 26, 2011
Texture ROCKS
As you know we are working to sell our home. It is a great home and we've done a lot to it...new windows, new fireplace, refinished the hardwood floors, added bamboo flooring where the hardwood was bad, perennial flower beds, shrubs added along the edges of the property on three sides, new appliances, plus loads of paint and elbow grease have made it a home we truly love and enjoy. That being said...it is still an older home and requires maitenance. One of the things that baffles me is that there isn't texture throughout the home. Some walls have it...some don't. The kitchen is one of the rooms that doesn't. Odd, I know. It hasn't been a big deal, but you can see every blemish, every crack...not a pretty picture.
The good news is that my Mom came upon this texture one can add directly to the paint. I decided to give it a try on the ceiling first...I figured if it was terrible at least it was above you and not staring you right in the face.
Here is a before photo of one section of the ceiling.
Here's what you do.
Go to the store and buy the container that matches your job...it comes in fine, medium, and coarse...read the box to find out which one you need. I can tell you that my Mom used fine and said that, "I wouldn't suggest it if you have little kids...if they run into it they are going to get scraped". I have medium and I like it because it matches the level of texture in the rest of the house.
Add it to the paint...making sure to stir it in completely.
Paint as you normally would...being sure to stir often so the texture is even distributed.
The after photo of the same spot (the little darker portions was because I had touched up there and the paint was still wet.)
Seriously...that's IT. So simple I could cry! I wish I had found this five years ago! I could have had such a pretty ceiling! It helps to hide imperfections that exist and overall gives a much more finished look to the ceiling. I cannot WAIT to do the walls. This post may not speak to many of you, but I believe that anything that makes life a little easier and a little better is DEFINITELY worth mentioning! By knowing a QUICK, inexpensive way to do this I get the job done and get back to playing with my kids and ENJOYING Motherhood. :) GO, TEXTURE!!!!
Wednesday, May 25, 2011
Potato Soup
Our church serves a Lenten Soup and Sandwich each Wednesday evening during Lent. (Yup, this post is REALLY long overdue since Easter was a MONTH ago...)
I have always been in awe of these ladies who cook soup for 150 people...and this year I decided was going to be one of those ladies...I decided to make a Potato Soup recipe I had made for a friend's Birthday bash. The recipe can be found here. I know that its nearly getting too warm for soup, but in case you're in the mood I would DEFINITELY suggest this recipe...totally YUM.
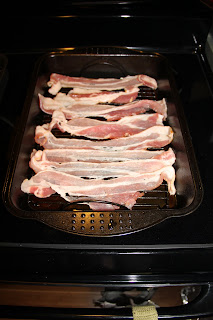
The part I found most intimidating was the bacon...for 150 people it said I needed 112.5 strips of bacon...yikes! So, I did something I hadn't done before...I broiled the bacon. It was STELLAR...so easy, so fast. Here is the bacon in the various stages. (Too bad I haven't learned to photograph meat better...it looks kinda nasty!)
Needless to say, by the end of that Wednesday my feet were super tired (I had also had youth group thrown in there). I was SO thankful there were loads of people who had pitched in so that I could get it all done...and I can cross "Make soup for 150 people" off my bucket list. ;)
Tuesday, May 24, 2011
Flannel "Spiral" Fabric Flower
For Mother's Day this year I made a corsage for a friend...normally I buy one...this year I thought I'd try to make it a bit more "her"...I actually made three different ones...I just got on a roll, I guess. I plan to show how to make all three in different posts so you can reference them a bit more easily. These were made as corsages...you could use them as a lapel pin to dress up an outfit, put it in your hair, sew it onto a bag for something fun, dress up a child's t-shirt...the sky is the limit...it's SO easy you'll be able to make loads!
What supplies will you need?
Flannel fabric, though any fabric would work...mine was an old sheet I got for $.25 at a rummage sale.
Scissors
Ironing board and iron
Needle
Thread
Button to accent
Pin back so that you can easily remove it from something and put it somewhere else
First, measure a piece of fabric about 24" long and 1.5" wide...this is NOT an exact science...it depends on how wide you want your "petals" to be...just keep in mind that you'll have to fold it in half so don't make it too small to start with. You can either cut the piece or, as I did, just snip the beginning, then tear the rest to get a tattered looking edge.
Second, fold the piece in half the "long way"...iron it in place.
Third, using your needle and thread make a long running stitch along the folded side of the fabric, just in from the fold itself.
Once its all stitched start to create your flower by pulling on the thread so that your strip of fabric starts to bunch up. Create the center of your flower first and then continue to wind the gathered fabric around the backing making sure to make a little stitches here and there as you to keep the fabric in place. Be sure to keep those stitches as close to the thread area as possible to keep things hidden.
When your flower has either reached it desired size, or you run out of fabric, you can cut the end and stitch it into place.
Add a button to the center of the flower to cover your beginning stitches.
Finally, add the back pin. That night I didn't have any jewerly pins on hand I ended up using a safetypin...stitching it through the top loop and the bottom (spring) loop of the safetypin worked just fine and saved me having to run out and buy something for the project.
We'll see you soon for more ideas on fabric flower making.
Monday, May 23, 2011
Scripture Memory Verse
I think those that are Christians all desire to know the scriptures better...we want them written on our hearts, but so often we've gotten "off track" or don't have the discipline to get the scriptures learned.
Here's what I propose...let's do this together! This summer, as part of my Christian Education work, I have started a summer memory verse program. Wanna join in?! We'll take it slow and just learn one scripture per week...we can do this!
This week's verse is:
Delight in the Lord and He will give you the desires of your heart. Psalm 37:4
Here's what I would encourage you to do...write that nugget on an index card...put it on your fridge or in front of your kitchen sink and when you get to those two places read it, try saying it, meditate on what it means...and if you already have that one memorized (WITH the address) consider yourself ahead of the game and hang tight until next week's verse. :)
Who is "in"!?!
For added fun...our church is also doing a summer memory verse program for kids.
Their first memory verse was:
"In the beginning God created the heavens and the earth." Genesis 1:1
Their verse for this week is:
"In my Father's house there are many rooms; if it were not so, I would have told you. I go to prepare a place for you." John 14:2
What fun to hear God's Word coming out of their little mouths!
Let's get started TODAY!
Make a List Monday**May 23, 2011
Our list was...
What five products "scream" summer to you?
sort of a study in culture of the times, right?!
Here's what I came up with...
1. Watermelon...it rarely tastes as amazing any other time of the year! Last summer we tried making balls of watermelon, popping them in the freezer for just an hour or so, then putting them in classes of sprite as a flavoring/icecube...something fun and simple...it might be "better" shaped if you pureed it and then put it in icecube trays to freeze it.
2. Slip-n-slides & Kiddie Pools...I remember as a kid my mom getting us a kiddie pool...we'd be SO excited to get it set up...we'd comb the ground for any rocks, then lay down the tarp, THEN put up the pool...it was always this kind:
My Dad would fill it with water from the water tank...which was water from a nearby pond...that tank pumped that water out so fast...it was unreal! He would spray us and I remember it nearly knocking me over!
3. Sandals...after many summers of the same old, same old, I got these last summer and LOVE them...
4. Screen Doors...ours only goes on in the summer...and its arrival is so exciting!
5. Sunscreen...to be honest, it's mostly the SMELL that screams summer...it just lingers...especially in my kids' hair...
I keep hoping that summer is "really" here...with our weather it's tough to tell, but I keep hoping. ;)
For this coming week let's make a list of The Five Best Ways to Fill Summer Days...what do YOU and your family like to do best on those blessed days of summer?
Subscribe to:
Posts (Atom)