Friday, December 9, 2011

The Joy of Flowers

Flowers...what else can make someone's day brighter?!
I know, I know, some argue, "They die, what's the point?"
The point is; they are LOVELY. (Plus, when you live in a state that is as cold as ours and only get to appreciate gardens for a few short months, live flowers are a sort of delicacy!)

A few weeks ago there were several special people who needed a little sunshine in their lives. I wanted to do something special.


I found a large pickle jar...
A felted sweater...
Some twine...
And wrapped the jar up in a virtual hug.
Threw in an arrangement and added a hand-stamped metal tag (not pictured) to let the people know I cared.

Dear Reader, perhaps you're right....they are "just" flowers. But those flowers symbolize that someone cares...and that is what matters most of all.

Thursday, December 8, 2011

Bathroom Shelf

I know most people are decorating their homes for Christmas...I have only just decided that it's time to finally decorate and settle into the apartment after 3 months. What can I say? It takes me a lot of time to get used to changes!

The question, of course, is where to start?!
I decided the bathroom was the easiest. I needed to make a place where I could get ready easily in the morning. The challenge I was having was that there was no counter space to work with...the other reason? The kids' toothbrushes had fallen into the toilet one too many times...and while toothbrushes aren't expensive, REMEMBERING to buy FOUR of them at a crack wasn't my favorite activity, either.


Of course I saw the cutest idea on Pinterest here...and decided to copy. ;)


I LOVE the look of the rough boards, but didn't think it would go with the existing colors that well. PLUS, I had trim and some boards on hand so this way there was no cost involved.


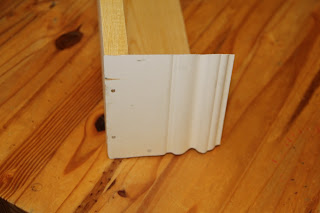
First, I took 1x4s and cut them to the same length and screwed them together to make a bottom and a back; and "L" shape. Then, I cut trim to go around 3 sides of it.

I nailed the side trim to the first 'L' shaped set.


I decided that in order to make it easier for myself I'd mount the shelf to the wall, then add the trim.


Once the front trim was nailed on, I painted the shelf. I waited until this point so that I could cover the nails with paint...I admit that doing the "L" shape earlier would have been easier, but it wasn't a big deal. I used regular craft paint I had in the apartment and did three coats. Once that was dried I sprayed the entire thing with Clear Polyurethane (don't worry, I opened a window first!)to add to it's durability.


I added some Mason Jars to the inside to hold toothbrushes, toothpaste, and puff-rounds, plus all my little extras. The inspiration piece had dividers...I decided not to do dividers as I didn't want to limit myself to what would fit where.


Now, not only does it give the area a customized look, but I have an easier time getting prepped for the day...not to mention there have been no toothbrushes that have gone toilet diving since I set this up. Now, THAT is awesome!

Wednesday, December 7, 2011

Apartment

So, you've heard a lot about "the apartment" and I'm sure you'll hear more in the days to come...I thought it might be helpful for you to see what it looks like.


Tuesday, December 6, 2011

Pre-Christmas Cleaning

I don't know about you, but prior to Christmas I like to take time to clean out the kids' room; not only to CLEAN it, but also to cull out some of those toys that are broken, have pieces missing, or have been outgrown. This makes Santa's visit a little less overwhelming to know there is space in their rooms for their new treasures.

Sometimes just THINKING about cleaning kids' room can seem overwhelming. It seemed that way for me a few weeks ago as I planned to attack Kiki & Leve's room. In addition to the cleaning and culling it was also time to put away their laundry. Because we now do laundry at a laundromat I go about 3 weeks in between visits so when it's time to put away it is a major task, not to mention that this time I was also going to pull out all their Summer/Fall clothes as Winter has arrived...let's just say I was looking forward to end result, but not the process!

Here's how I made it more manageable.
First, I grabbed a couple of extra baskets/boxes to create a few helpful areas:

1. Garbage.
My kids love to save little scraps of paper and are notorious for using tissues to make doll beds that later get shredded into confetti. Ugh. SO I saved myself a million trips of emptying their garbage by getting on large basket.


2. Items That Belong Elsewhere
Instead of running around the apartment, I simply gathered everything into the basket and walked through and put things away at the end. In case you're wondering, yes, those are my metal snips in the box. Double UGH.


I also recovered 8 sippy cups/water bottles. Awesome.


3. Toys
Because their room was a disaster when I started, I didn't worry about actually dealing with the toys right away; I just put them in a pile to go through later...one of those boxes also became the "donate" box when we got to that point.


4. Laundry
My final sorting box was for laundry. My girls LOVE to use their clothes for doll beds, places for stuffed animals to rest, curtains for puppet shows, etc. They are only allowed to do this with clothes they've already worn, though...which means that by the time we finally go through the room there is quite an accumulation of dirty clothes/play items.


I began at the door and worked my way around the room sorting everything to it's box. Once that was done I took the garbage to the dumpster, put the dirty laundry in my 'laundry closet', and put the "goes somewhere else" box in the hallway...already the room was MUCH tidier!

Next, I sorted their clean clothes into the following categories:
1. Clothes for storage for next summer or someone to grow into.
2. Clothes to hand down to cousins.
3. Clothes that were gross and needed to be rags
4. Clothes to be worn this winter.

I boxed/bagged #1-3 and put away. Then, the girls and I went through #4 and they tried on each item of clothing. We did this as I wanted to make sure the item fit, if it needed repairs, and to find out if they even LIKE wearing the item. I was surprised at how many pieces they didn't actually care for and could be passed down! I made a pile of those, as well as items that needed repairs and/or needed length added or an alteration to make it last longer.

I then put their clothes away.

Next was toys.
The girls helped me with this. We sorted the toys they liked, they picked out ones they didn't love "so much" to donate to kids who don't have toys, and argued about toys that were broken-beyond-repair that needed to be tossed.
(This was the LONGEST part for us!)

Once sorted I took photos of what was in each box. Those photos then went on the outside of each box to help the girls know where to put things away.

Finally, I actually got to CLEAN their room..dusted, wiped, vacuumed...it smelled great! Of course, an hour later it was in upheaval with dollhouses, kitchen play, and such...at least I tried!


**You'll notice I still haven't done much in the way of decorating the apartment...part of me keeps thinking, "We'll be out of here soon." and doesn't want to bother...of course, Chad has been living here for 6 months and we've been here for 3 so I might want to rethink that! Tee hee!**

Monday, December 5, 2011

Adventures in Duluth--Enger Tower

Winter has been slow in coming year...I am so thankful! I am 100% a summer person and just a dusting of snow for Christmas is all I desire.

We have tried to make the most of the beautiful weather by exploring whenever we can. Recently we found ourselves at Enger Tower...such a cool place! Too bad it was so cold and windy once the sun set!

Here's some photos of our adventure.
What have YOU been doing with the blessing of mild weather?!


Friday, December 2, 2011

Make a Wish & Do Some Good


It's that time of year when everyone is asking us Mamas "What does (insert child's name) want for Christmas?"

Perhaps you don't want your child to get one more item to fill up their already stuffed toy boxes, but, for better or worse, Aunties WILL be Aunties and Grandmas WILL be Grandmas...and kids WILL be kids! Of course they have wishes and dreams...who doesn't remember the magic of Christmas as a child? The anticipation of what Santa might bring?

So, here's a tip to help you know how to answer, provide a writing exercise for your little students (even if you don't home school, practice is always a good idea!), AND do some good in the world. Are you ready?

Have your kids write a letter to Santa.

Simple, right? Maybe you've already done it! Well, bring a stamped envelope containing your letter to Macy's Department store and Macy's will donate $1 to the Make-A-Wish Foundation, up to 1 million dollars. Have you seen this? Perhaps I'm the only one who doesn't have television and hadn't heard about this, but even if you have, you really SHOULD check out their website. You can write and decorate the letter online, then print and drop it off. You can locate the nearest store to you. You can listen to music. It really is a sweet little site.

The Make a Wish Foundation once granted a wish for my cousin who had leukemia...he wanted a hot tub in his house and they made it happen. In the midst of this terrible disease he was distracted by the idea of a hot tub actually BEING in his house. He got to sit in it and enjoy the water without having to leave home. Did it cure him? No, chemo did that. BUT it made his disease that much more bearable for he and his family.

If writing a letter to Santa would help make that happen for even ONE kid, I'm sure we'd all write 1,000 letters! And it can, so pull out those pens and paper and get to it! The deadline is December 7th, after all!


**HUGE kudos to my niece, M, for letting me know about this initiative and for the work her Honor Society is doing to gather as many letters as possible**

Thursday, December 1, 2011

Christmas Cards

So I LOVE Christmas cards! L-o-v-e them. As a kid I remember coming home from school and scouring the kitchen table to see if we'd gotten any that day while I was gone. Seriously. Love them.

I love hearing what people are up to, seeing the cute photos of their families; throw in some creative writing (writing from their pet's perspective, making what they've done this year into a puzzle, rhyming each line...LOVE!) and I'm in heaven.

I also fall into the group of people who believe that if you want Christmas cards, you'd better send them out! So we do. As a kid I helped my Mom do it, in high school I wrote cards to each of my friends, which I continued in college. And, of course, when the Spouse and I got married the tradition grew even stronger....

Of course, the trick gets to be paying for the cards (and their postage...yikes!). So, what is a girl to do? As with most things there are 100 ways to skin a cat, but here's how I did it.

First, I attacked the issue of postage. Clearly the year I sent Christmas CDs in the cards jacked the shipping to astronomical heights....$1.50 x 200 cards...I thought I was going to faint. SO, what's the exact opposite? Postcards. $.29 per card. Perfect.

But, how to do it so you get the photo and the text that you desire? Again, many different ways to do it, but I utilized a few online resources: Picnik and Vistaprint

What I did was took a regular photo of our family to Picnik. (This was taken one random day when we were out and about; we hadn't planned on this being our card photo or we would have gone for matching outfits...or even pulled a comb through the kids' hair! Alas, we loved the scenery and everyone was looking the right direction...we went with the "close enough" thought this year! I did, however, clone-out the guy who was playing in the falls behind us!)


I utilized "stickers" and "text" to add the wording (forgive the blue box; that was where our names are...I do try to keep some of our information private for safety).


I saved the file to my computer and then went over to Vistaprint...I linked to them from an ad on my blog...I'm sure you've seen their little ad buttons all over the place; if not, you can sign up to get "deals" from them at their website. I picked an ad that was offering 100 free postcards.

I picked a blank postcard template, uploaded our photo, then added our Christmas letter to the back. When I checked out I had to pay shipping, but that was it. It cost $10.36 for 100. Of course, I needed 200...so I went back and did the entire process again. $20 for 200 cards....$.10 per card! I would say the only draw back is that the standard sized postcards made it so that I had to go with size 8 font on the back which is REALLY small. :( If we had fewer kids or less to tell I could have made it larger, but I had already cut a lot from the letter so I just left it. Hopefully our older friends/relatives will have a magnifying glass handy so they can read it...yikes!

So, my grand total for doing our Christmas cards this year will be $78...$.39 per card. Perhaps I'll buy, as my sister-in-law did, a bottle of wine for myself with the savings. Aw...who am I kidding? I'm totally buying craft stuff! ;)

Have a great day,
Stacy