Saturday, December 31, 2011

Here's to 2012

Can it really be 2012?!?!


I honestly do!!! We've heard our Grandparents and our Parents say it a million times and they are RIGHT..."Time goes by so fast."
Instead of dwelling on the sad (which I am an expert at, by the way) I am going to look optimistically at the future. AND I'm going to pray that by posting my "resolutions" (I prefer to call them "try harders") here I will be held accountable. Here's hoping, right!?!

So here are some areas I want to "try harder" at:

1. I want to work to do more bulk cooking. I LOVE it when I can pound out several days worth of meals in one kitchen session. I feel so powerful and put together when I have hotdishes in the freezer just ready to be thrown in. I used to do this frequently on Sundays when we were living in our "hometown"...since moving to D-town it hasn't been happening much. I will work on this.

2. Get back to using the Envelope System. The spouse and I REALLY enjoyed our Dave Ramsey course and used the envelope system for several months before 'life' got in the way and we went into full-on survival mode. No more. I refuse to keep living in "what if the house sells soon" mode or the "well, we're not going to be in the apartment forever" state. Enough. We may well be living this way for quite some time and one year has nearly passed already! No more wasted time. WE WILL live life on our terms...regardless of where. (I realize this may sound silly that we haven't gotten to this place before now...)

3. Continue working out 12/month at the YMCA. I'll admit it. I'm one of "those" people who actually will MAKE myself go and work out just to get $20 reimbursed from our insurance company. I haven't seen much in terms of drastic physical changes, but I do enjoy getting my Netflix time while doing my cardio. :)

4. Continue with my lesson planning book. Prior to this fall I had done all lesson planning on the computer, but didn't do a stellar job of making sure things got DONE in a timely fashion. I started doing it pencil to paper this fall and it has made SUCH a difference. Don't ask me why, it just does! Maybe because the kids can see it more clearly too? Anyhow, we're going to keep that one going.

5. Communication.
With The Spouse. With the Kids. With my Friends. I want to work on doing more of this in a more meaningful way. I realize this is pretty vague; I'll work on specifics soon. ;)

I think those are the highlights for the year. Sure. I'd like to do more craft projects, have a tidier house, get the kids' baby books up to date...I certainly will try, but for now those 5 will help most with my day-to-day living. And, as we know


What are your "try harders" for 2012?

Top 11 of 2011

Let me start by saying, "THANKS". Thanks for being part of this journey...for reading and sticking with me. Yes, I "only" have 27 "followers"...but I am thankful for each of you and for the feedback and giggles you've given me. This blog has been a tremendous outlet for me and has assisted me in living life with a lot more intention and reflection...two things I strive for.

So, without further ado, here are my 11 favorite posts/projects from 2011. What were yours?

11. TJ's Scooter Tutorials
10. Babies are Easier than Houseplants
9. Scripture Memory Verses each week this past summer.
8. Christmas Outfits
7. Bathroom Shelf
6. Platter Earrings
5. Why Is There Popcorn on the Bathroom Floor?
4. TJ's New Hat Tutorial...because it was more feminine than the first one! Silly Mommy!
3. Silk Dyed Easter Egg Tutorial
2. Mom Where's My ______

And the one that started it all...
1. SURVIVING Motherhood?!?

Here's to another year of giggles, learning, and love!

Monday, December 26, 2011

Didn't God Know?


Oh, Friends...what a blessing these last few days have been! Watching dear ones gather to laugh, share, and yes, even cry at the passing of a beloved Aunt/Great Aunt, has been astonishing. I heard an amazing quote the other day that went something like this,

As I watched my dear ones gather, which banished strife and care
I stood in awe with no words to express
Doesn't God know that my heart is too small to hold this happiness?


I don't know about you, but I had a few of those moments these last few days. My throat tightened and tears welled up as I looked at the blessings that have been poured out on me. Blessings I do not deserve. Blessings that I can scarcely begin to express my thankfulness for; indeed, my heart is too small to hold all the joy.

May it be so in your own heart.
Blessings to you today and always,
Stacy

Saturday, December 24, 2011

Things to do, Things to do...

If you're anything like the majority of the population your to-do list right now reads like a novel! I can totally relate. At the start of this week I honestly thought I was going to have a stroke as I tried to figure out how to get it all done. Today? The list is not done, but I'm relaxed and completely content.

How? You're thinking I stayed up late each night to get it done or I have had a large amount of wine? Nope. The Spouse and I took the kids on vacation. For real.

With a to-do list a mile long we decided to head out to our "home" town and go to the waterpark.

Now, I didn't shirk any of the "have to" on my list. I got all my orders out, I took care of bills that needed to be paid, and got my laundry done(I mean the kids HAVE to have clean underwear, right?!) but I really LOOKED at the list. I decided that making those little extra handmade items could wait until next year...or would even make a neat Epiphany gift! New recipes weren't crucial. The caramel didn't need to be wrapped immediately. Wrapping gifts ahead of time wasn't vital. In short, I took stock of what was REALLY important this time of the year. We all KNOW what is important, but do we always follow through with our actions? For once I feel like we got closer to getting it right.

We took a few days and just bummed around with friends...eating pizza at our favorite restaurant, running gifts to dear ones, and enjoying a fire in the fireplace. We also took one entire day and spent it at the waterpark as a family. We played and laughed and took turns crawling up 3 flights of stairs to ride the slides with the kiddos. We snuggled and teased and ate and told jokes. We were silly and carefree...and the joy of the season FINALLY filled us up. At the end of an exhausting day we looked at one another and thanked God for the blessings He's given us; most of all for Jesus.

I pray that in the midst of this busy season you would find a minute to let the LOVE of Christmas fill your heart with joy and peace...that you would have the opportunity to truly stop and look with total love on your dear ones.
In short, Readers, I wish you a VERY Merry Christmas.

Wednesday, December 21, 2011

Take a Break Jar--Christian Style

Alrighty, folks...I have a confession to make...sometimes I forget my kids are in time out. Before you gaffaw...my husband does it too...and my own Mother complimented me on how compliant my child was because she sat in timeout for around 30 minutes without saying a word before my Mom remembered she was in time out! Judge if you like; it just happens sometimes!

So when I saw these "Time Out" jars on Pinterest I was intrigued. I think the person who came up with them thought they would be a great way for the child to relax and unwind during their timeout...I'm just thankful for a way for them to know when they can come out that doesn't involve a timer they can tinker with!


Here's what you need (and what I learned) when making a jar:
Jar with lid
Strong glue. I used E6000
Water and/or Baby Oil
Glitter
Contact paper (optional)
Markers (optional)
Scissors (optional)


First, I put contact paper over my lid; I would preferred to spray paint, but it's just too cold right now to do that outside.


Next, I tested the glitter in water and then in a small amount of baby oil. For me, the glitter fell way too fast in the water; I wanted my kids to be in timeout for a bit longer so I went with the baby oil. (I should warn you that the baby oil gets a bit cloudy after a while...it might have something to do with the water I added or my glitter being poor quality.)


I ended up not having enough baby oil to fill my jar...so I used water to fill it the rest of the way. Then, I added the glitter. I then put the glue on the inside rim of the jar and twisted the jar on; the glue will make it impossible for little hands to "accidentally" open the jar, spilling baby oil and glitter all over the carpet (and leading to another time out...for Mommy...with a glass of wine...)


Then, I shook it up. You can guess what happened next. The water and the oil separated; water on the bottom, oil on the top...the cool thing? The glitter rests in between! LESSON TIME!


When I presented the "Take a Break" jar to the kids I told them that they would use this when they were put into time out or were asked to take a break for rough behavior. They would shake and sit to watch it settle. (I warned them that not ALL the glitter would settle, but that when it stopped moving they could come and find me.) I then demonstrated it and told them to think about the glitter as the things they had done that weren't good; our sins. I told them to think of themselves as the bottom of the jar. As it started to settle they immediately noticed that the glitter didn't fall to the bottom of the jar. I said, "I KNOW....that's because where it is settling is like Jesus. Jesus died to take your sins...you're clean because He died for you. No sins stick to you or fall back to you because of Jesus. During time outs I want you to remember that because Jesus' love we get a second chance every time we mess up."


So far it's been a HUGE help in making sure they get out of time out on time AND it reminds me that we've all been given grace; I am not perfect and there is no way my children will be either. When they get put in timeout for the 80th time that day it reminds me that my heavenly Father is probably looking at me and wondering WHEN I'm going to get it right...yet He extends His patience and love. And it reminds me to do the same for my children.

Tuesday, December 20, 2011

Christmas Outfits


I found THE cutest dresses for Kiki & Leve last year after Christmas at Hanna Andersson. (Seriously...how MUCH do I L.O.V.E. their clothes?! The pricetags? Not so much. But clearance...booyah!!) So they have been sitting in my basement for the last 11 months just waiting.

Now, if you remember from my pajama pants post, I adore dressing my children alike. I don't do it alot because, let's face it, I don't want to be THAT lady, but I indulge myself on special occasions.


Of course, at the time, there wasn't anything online for the boys that would match and so I've spent 10 months or so noodling about what the boys were going to wear. About a month ago I was in a second hand store and saw this sherpa sweatshirt that was nearly identical to the fabric of the dresses for $4.29.


The night before the Christmas Pageant, I found a vest/sweater that fit each of the boys and cut out a rough pattern.


Finn's was cut from the main part of the sweatshirt. I used the bottom of the sweatshirt for the bottom of the vest so I didn't have to any finishing on that portion...score!


TJ's was cut from the sleeves. I just opened them up to get more fabric and used the cuffs of the sleeve for the bottom of the vest...again no finishing work for me!


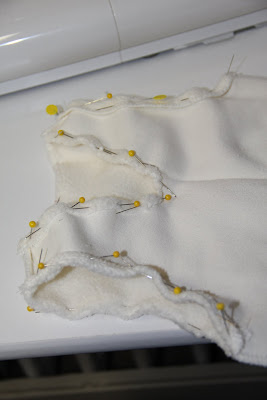
After each was cut, I took it the serger where I serged around the arm and neck pieces. I didn't cut anything off, just made sure I had a nice edge.


Next, I pinned the sideseams right sides together; then sewed.
Same with the shoulders.


At this point you have a vest; though a bit raw. I folded over and pinned the arm holes and neck line and sewed them down.


I then turned the vest right side out and pinned on the embellishments that I had cut from red craft felt. I sewed them down using white thread.


Aren't they cute? And it only cost me $9.29 for the boy's vests. Oh, the other $5?! That's what it cost to get Finn to wear it with a smile. Guess this might be the last time I get to dress them alike...unless, of course, I budget the bribery into the cost of the outfit.

Monday, December 19, 2011

Santa's Workshop--A Scooter for TJ--Part II

Welcome to Part II of the scooter making. In case you missed it, you can check out Part I here.

Once the stain was set we stained the other side of each piece. When it was dried, we screwed the top portion on to the dowels. To make this a little easier I did a few things.
First, I made an indentation in the center of the dowel.


Then, I screwed from the top of the scooter, going going about 1/2 way.


Next, lining up the indentation with the 1/2 way screw I hand screwed the dowel into place. I did alternate from screwing from the top, then hand screwing the dowel onto the screw until it was tight. I did this because I wanted to make sure I had control over exactly how the two pieces were coming together.


Now that we had the top, I double checked where I had lined everything up by setting the top on the bottom piece to verify that my holes were in the right place.
Once I was sure they were, I went to work on screwing the bottom portions into the dowels. I found it necessary to pre-drill holes into the dowels to help them come together easily.


Next up were the wheels. I purchased ones with a covering to them to protect little toes (just in case!) and screws to hold them in place.


I made certain to put the wheels as far out as I could (for stability), WITHOUT them going outside the border of the wood when they spun. Again, those little toes are so precious, I wanted to make sure that they have as little chance as possible of getting snagged.


Now that most of the components were in place, I needed to do some touch ups. The screws brought up some splinters when they went through, so I sanded those off and re-stained those areas to match the rest of the scooter.


Once those were dry I put on the U-bolt. Now, I'm certain that you can probably buy a wide U in a shorter length, but when you're shopping with 4 kids under age 8 at 7:30 at night after dance class you tend to just grab the closest thing. Am I right?! You could probably also cut yours to a shorter length if you have the right saw...which I don't. So, mine is longer than I would have liked, but I bought acorn bolts to cover the sharp edges.

I was tempted to do the plastic dip finish on the Ubolt, but it was $6 for the can so I decided to skip it. If we find we need it later, I'll take off the U bolt and add it.


Since it is underneath where TJ will sit, I don't think it will be an issue.
Once that was on and tight, we had ourselves a scooter! Now, just to wait until Christmas morning to see his sweet face....the excitement is killing me...perhaps this is why Santa says, "Ho, ho, ho" so much?! Maybe he's worried if he uses actual WORDS he'd give the surprises away!

Sunday, December 18, 2011

Santa's Workshop--A Scooter for TJ--Part I

Santa may be coming to town, but he's getting help from this Mama.

I thought long and hard about what to get TJ for Christmas. It's tricky when he's 22 months and can't express anything he WANTS. Even more so when he has 3 older siblings that have received just about every conceivable type of toy there is in the 8 Christmas' previous. So, I gave up on "needs" and thought, "What sort of toy do I want to be able to give him for HIS kids to play with some day?"

Well, I thought of the toy that my brothers and I played with that had belonged to my Dad...it was a metal pedal car and we LOVED it...it looked really similar to this one.


I decided a ride-on would be just right for his age.

So I started to look online. Wowzas...there are loads of choices that I would classify as heirloom quality...


But, with prices ranging from $79 to $548 (for reals...the airplane in the upper left is $548...BUT you do get free shipping!;)!) They weren't exactly in my price range.

So, what do we do, Girls?!
If you know me you know the answer, "We make it ourselves!" I found a cute option online and did my best to copy-cat.


Here's what I bought:
1 inch thick plywood
1 2" dowel
4 caster wheels
1 U bolt
2 Acorn nuts to match Ubolt
Stain Gel


You'll also need:
Sand paper (I used fine, medium, and coarse)
A cloth for the stain
Saw (band saw or hand-held jig is fine)
Screwdriver with both screw head and drill bits
3 screws


I started by cutting my dowels into 6" lengths.
I determined that I wanted the seat to be about 10" off the ground (this is what most standard ride-ons sit at) and determined that the wheels were 2", the pieces of plywood were each 1", so I needed an additional 6" to get to 10".


Next, I used plates to make the top and the bottom piece. First the length: the top is 16" long and the bottom is 18" long. Then width: top is 8" and the bottom is 10". I then found the middle of the pieces and marked where the indent should go to accomodate shorter legs.


After they were marked, I cut them out. No. I do not have a workshop. I have a kitchen table and a hand-held jig saw. Classy, I know....and also gives me license to tell you to put the excuse of "I don't have a place to do it" or "I don't have a lot of equipment" on the shelf!

Once cut out I used coarse, medium, and then fine sandpaper to smooth out the pieces. Once done I used a damp (not WET) cloth to pick up any left over dust from the pieces.


Next, I marked where the dowels and U bolt were going to go and I drilled the holes for the U bolt and sanded those little pieces that came up.


Next we stained the dowels and the bottom of the top piece and the top of the bottom piece. Confused? Basically we stained anything that wasn't going to have a screw showing out of it.


The older kids have been in on this project and they helped me pick blue and red for our stain. We went with stain over paint simply because we wanted the wood-grain to show through and give it a more natural feel.

More tomorrow as we finish TJ's Scooter. :)

Saturday, December 17, 2011

Upcycled Christmas Stockings

As you've read, our Christmas Decorations are in storage 2.5 hours away...as in BURIED. We have a handful of decorations that remain in our house because they couldn't be frozen (snow globes, for example), but Christmas Stockings didn't make the cut...in fact, I'm pretty sure I used them as packing material.

Santa certainly needed something to put our Christmas goodies in, though, so I set to work.


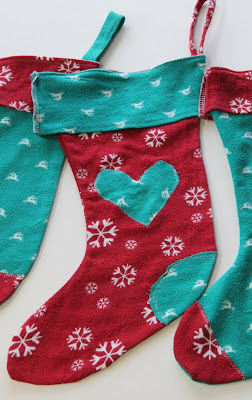
The kids and I found these great flannel pajama pants at a second hand store...$2.50 for the two pairs. I had thought we'd buy some flannel sheets, but these were so cute.


We came home and I laid the pants out and cut out the stockings shape. I would have been able to get 4 stockings out of each pair of pants, but alas, we only did 6 pairs; three from each print. Then, we cut out the embellishments and I zig-zagged them onto the main part.


We then cut cuffs from the remaining fabric. Basically it was 2 rectangles of fabric per stocking. I serged the edges and then folded one long side down and straight stitched with my machine to get a nice finished edge.


Next, I attached the cuff to the main stocking part. This took a little thinking to imagine how to line it up so that when the cuff was turned down the fabric would be facing the right way. (Not tricky, but The Spouse and I were watching Park and Rec at that point, so I had to actually pay attention to what I was doing!)

Once the cuffs were on I put the stockings right sides together and sewed the two sides together.

Finally, in a stroke of genius (or laziness) I realized I didn't need to sew fabric strings to hang them from...we could use the ties from the pants! EASY. I simply pulled out the strings as much as I could and cut them to the right length and sewed them to the inside of the stocking.


We're ready for Santa to come!

Friday, December 16, 2011

Bentleyville, USA

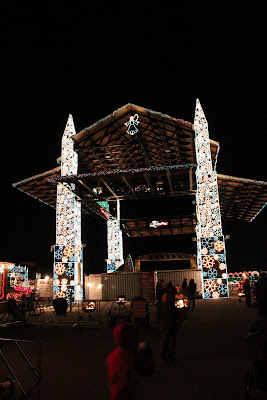
I've done my best to share adventures that we've had in our new town...and this one is probably the best so far.

We've been 4 times this year, so it's sad that this post is so long coming, but I have struggled to put into words the magic of this attraction. So I won't. I'll share the pictures and extend a heart-felt invitation. Come and visit! Info can be found on their website here. You won't regret it, I promise.